
A well-written blog section can do wonders for your search engine rankings and website page views. But, it’s not enough to just have words on your blog post — you also need to be sure it’s the best resource for your readers.
Here are 5 easy techniques we use to optimize our own blog content.
Add Original Content and Perspective
The number one thing people want to know when they’re reading a blog post is whether or not they can trust the author. And, nothing says, “I’m experienced on this subject” like original content!
There are two ways you can add original content to a blog post — you can pull from your own experience, or you can create original multimedia content to embed on the page.
Use Your Personal Experience
When someone writes a blog post about a topic they don’t have experience in, it can feel like you’re reading a product description from Amazon. To get readers’ attention, we need to provide value and insight from real experience!
Here is an example without personal experience:
Ring Cameras are great and the monthly subscription only cost $3.99/month for 1 camera.
Now here is an example with personal experience:
While I love my Ring camera, I wish I knew they charge more than 2x for additional cameras with video history. I would’ve considered a Wyze camera as they don’t have a monthly fee.
While the first example isn’t all bad, the second example shows how personal experience can provide even more helpful information. This also makes your content more trustworthy and honest- which is what most people are truly looking for online.
Add Original Multimedia Elements
Adding photos, videos, and infographics to your blog posts is an easy way to boost your rankings.
Google likes high-quality, relevant photos and videos, and while royalty-free is okay, original content goes much further in establishing credibility.
Let’s say your website is about Range Rovers and you’re writing an article about it. Instead of getting a stock photo of the car, why not take a picture with your Range Rover instead? Here are two examples where one is clearly a stock photo and one could be an original image you provide.


Which is better? The writer who pulls the first related image they find off the internet, or the one who snaps a photo to prove they have personal experience with what they’re talking about?
The more original and relevant images you can provide, the more trustworthy and relatable you become.
Cut Out Fluff
Nothing kills your “Average Time on Page” analytics like too much fluff.
When people turn to the internet for an answer to their question, they want to find out what they need to know as soon as possible — they don’t want to read a long paragraph that only sort of relates to the issue.
The main thing that causes “fluffy” writing is a writer trying to meet a specific word count.
If you’re trying to write 1,000 words but have said everything there is to say about the subject by the time you hit 750, you’ll probably start thinking of ways to get more words in there.
While the tone of blog content should always be conversational, going off on tangents, offering your personal opinion instead of direct facts, and “overexplaining” can detract from the overall message.
Here’s an example of a “fluffy” section:
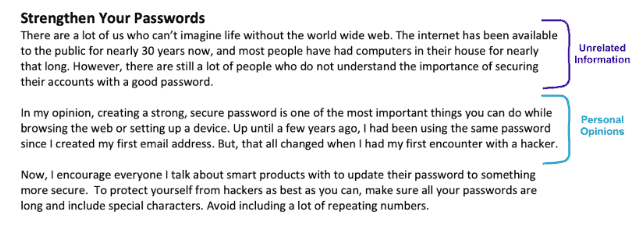
The title of that section is “Strengthen Your Passwords.” So, what should the content focus on? Strengthening your passwords.
We don’t need a whole paragraph on the invention of the internet or what inspired the reader to create a stronger password.
Let’s cut out the fluff and see what we’re left with:
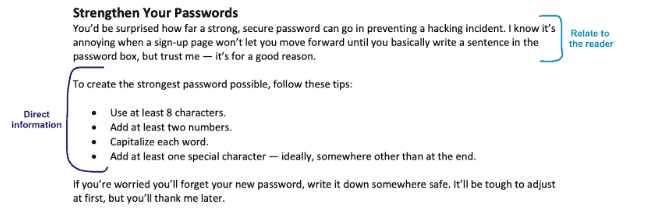
The tone is still conversational, but we get right to the point — strengthening your password will protect you from hackers, and here’s how you can make your password more secure.
While it is true that a 1,000 to 2,000-word blog post will usually do better in the search engines than a 500-word blog post, you never want to sacrifice quality for quantity. Focus on adding relevant information, and worry about length later.
Add More Images
The more relevant images you can add to a blog post, the better. But, you need to be sure any images you add do one of these three things:
- Helps the reader understand the content better
- Makes the article more interesting
- Makes the article more visually-appealing
One type of image that every article should include is a featured image. This is the image at the top of the blog post, right underneath the title.

Adding a featured image captures the reader’s attention and encourages them to click on the post.
This is true not only for readers on your website but also for any readers who see your post shared on social media.
For your post to be picked up by Google Discover, your featured image should be at least 1200 px wide.
However, larger, slowly-loading images can negatively impact your page load time, so always resize accordingly.
As we discussed above, adding original images can help boost your site’s credibility and make your content more interesting. But, you don’t want to overload a post with images.
A good rule of thumb to follow is one image per header. Again, readers don’t want to scroll through a ton of useless information or images before they get an answer to their question.
If an image doesn’t complement the content, or if it negatively impacts your page load time, take it out.
Should I Add Alt Text to Images?
When you upload an image to WordPress, you’ll see a box where you can enter the image’s “alt text.” Adding alt text to your images is important for two main reasons:
- It describes the image to search engines
- It helps readers who use screen readers
Alt text is important not only for accessibility reasons, but also for optimization. It should describe the image in 125 characters or less, but you’ll typically only need 4-5 words.
Use Internal Links
Internal links are links to other pages or posts on your website. When used correctly, internal links can increase your credibility and “Average Time on Page” analytics.
A good internal link is linked to more than one word and tells the reader exactly where they’ll be going next.
Take this article, for example. This post is all about decorating your home with LED light strips, and this section suggests using them around your computer desk.

We’ve let the reader know that, after they decorate their desk with LED light strips, they may be able to sync their lights to the music they’re listening to — something we have another article on.
Clicking the words “sync the lights to the music” will bring the reader to another blog post about how to sync your LED light strip to your music.
This is an example of an internal link done right.
We didn’t just link the word “music” to an article about renewing your Spotify subscription. The highlighted text clearly shows the reader where they’re going next and offers them the information they’re probably interested in.
The longer you can keep a reader on your site, the higher your rankings will be, and the more people will rely on you as a trustworthy source.
However, linking irrelevant pages or pages that don’t deliver what you promise can have the opposite effect.
Whenever you add internal links, make sure they apply directly to the content and will help the reader meet their goals.
Fact Check for Accuracy
The main purpose of having a blog on your site is to establish yourself as a credible, trustworthy resource.
Not only will publishing inaccurate information work against this goal, but it will also tank your rankings!
For this reason, fact-checking every article before you publish it, and only looking at credible or official sources while researching an article is an absolute must.
Read through every article you receive from a writer, and if something seems fishy, do a quick Google search to confirm that it’s accurate before you publish it on your website.
